


Key Takeaways
- Before proceeding with a heated driveway installation, consider factors like local climate, budget, driveway size, heating system type, and projected costs and energy consumption.
- Electric & Hydronic heated driveways have a different installation approach. Make sure you are familiar with the approach for your chosen system.
- Installation timelines typically range from a few days to weeks, depending on the project’s size and complexity.
Heated Driveway Installation Process Step by Step
Heating concrete floors can provide a comfortable and efficient heating solution for your home. Here’s a guide on how to effectively install a heated driveway:
In-Depth Planning and Design:
- Conduct a comprehensive analysis of the driveway area. Include a detailed survey of dimensions, slope, drainage patterns, and any potential obstructions.
- Calculate power requirements with a focus on energy efficiency, considering your local climate and specific heating needs.
Precision Excavation:
- Execute the excavation with precise depth control, adhering to local building codes and manufacturer’s guidelines.
- Prepare the base of the trench to ensure stable and level support for the heating elements and insulation.
Advanced Insulation Installation:
- Choose high-performance insulation materials like extruded polystyrene or closed-cell foam to maximize heat retention.
- Cut and fit insulation precisely, ensuring complete coverage and minimal heat loss, especially at the edges and corners of the trench.
Optimized Heating Cable Layout:
- Lay out heating cables in a meticulously planned pattern to ensure uniform heat distribution across the driveway.
- Use advanced securing methods, such as specialized clips or adhesives, to keep cables in place during and after installation.
Smart Control System Installation:
- Install a programmable or smart control system that allows for remote operation and monitoring.
- Integrate temperature and moisture sensors to enable automatic activation of the system based on real-time weather conditions.
Careful Backfilling:
- Backfill the trench with materials that complement the heating system, such as sand or fine gravel, ensuring good compaction without damaging the cables.
- Consider adding a layer of fabric or mesh above the cables for additional protection during backfilling.
Professional Paving:
- Select driveway materials that are conducive to heat transfer and durability, such as certain types of concrete or asphalt mixes.
- Ensure that the paving is done evenly and professionally to prevent any thermal “cold spots” or uneven surfaces.
Expert Electrical Connection:
- Ensure all electrical work is completed by a certified electrician with experience in heated driveway installations.
- Include a thorough inspection and testing phase to verify the system’s functionality before finalizing the installation.
Hydronic System Installation

A hydronic heated driveway system uses a series of tubes filled with a mix of water and antifreeze to heat the driveway. The installation process for a hydronic system is more complex:
Understand the System:
- Learn how a hydronic SIM system works, typically using PEX, PE-RT, or PP-R tubing for circulating a heat transfer fluid to remove snow and ice.
- Recognize its suitability across various climates.
Choose the Installation Type:
- Decide on the outdoor surface type: poured concrete, interlocking pavers, or asphalt.
- Consider placing tubing 2 to 3 inches below the surface in poured concrete for faster response.
Install the Tubing:
- For poured concrete: Staple tubing onto insulation board or tie to rebar/wire mesh within the concrete.
- For interlocking pavers: Install tubing above insulation using plastic rails, staples, or screw clips, encased in compacted sand.
- For asphalt: Place tubing above insulation and encase in compacted stone dust or sand media.
Insulate the System:
- Install appropriate insulation (XPS, PU, expanding foam) below the SIM surface to minimize heat loss.
- Apply insulation onto existing concrete or earth to follow contours.
Design the System:
- Select the appropriate performance level and determine the required heat output.
- Size the heat source to meet peak load and design the piping distribution system (size, spacing, circuit lengths).
- Size hydronic equipment, including circulator pumps and expansion tanks.
Control the System:
- Choose a control strategy: On/Off, Idle/Melt, or Always On.
- Set up controls based on moisture, temperature, and required heating cycles.
Final Considerations:
- Assess the integration of the hydronic system with your home’s plumbing.
- Understand the complexity and potential higher cost compared to electric systems.
Heated Driveway Installation: Electric vs. Hydronic Systems
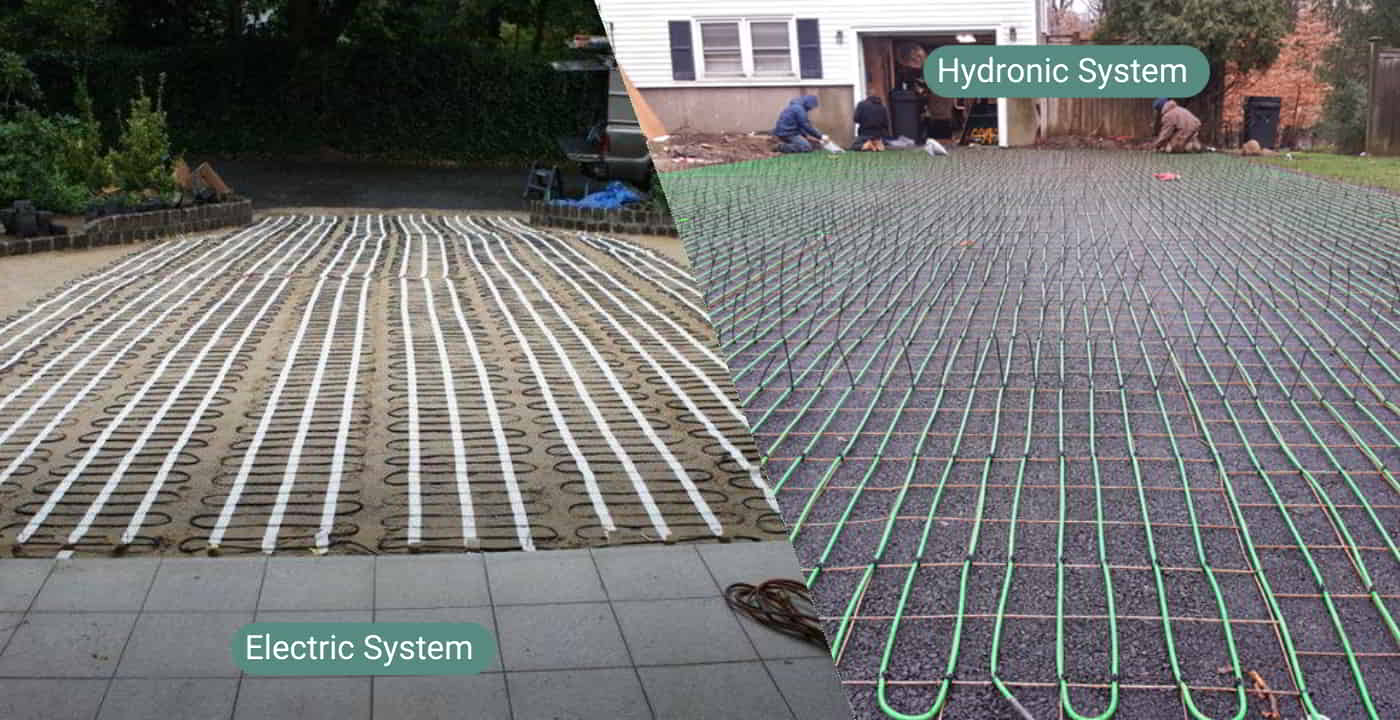
Heated driveways are excellent for snow removal, coming in two forms: electric and hydronic. When considering ease and cost of installation, electric systems are generally the preferable choice.
Simplicity of Installation
Electric heated driveways use heating mats or cables connected to your home’s electrical system and a control unit. The installation process is straightforward and quick, involving less time and manpower compared to hydronic systems.
Conversely, hydronic systems require tubes filled with an antifreeze solution, a boiler, and integration with your home’s plumbing. This complexity often leads to a more laborious and costly installation.
Lower Upfront Costs
Electric systems have lower upfront costs due to less expensive materials and quicker installation. However, keep in mind that while initial costs may be lower, the operating costs can be higher depending on local electricity prices.
Flexibility
Electric heated driveway systems offer excellent flexibility. They can easily be customized to fit any driveway shape or size, making them an attractive choice for unique driveway layouts.
Frequently Asked Questions About Heated Driveway Installation
What are the key factors to consider before proceeding with heated driveway installation?
Before proceeding with a heated driveway installation, you should consider factors like your location’s climate, your budget, the size of your driveway, and the type of heating system (electric or hydronic) that would best suit your needs. It’s also crucial to understand the installation and operational costs, as well as potential energy consumption.
What are the benefits and drawbacks of a heated driveway installation?
The most significant benefit of a heated driveway installation is the convenience it provides during the winter months – no more manual shoveling or salting. It can also increase the longevity of your driveway by preventing freeze-thaw cycles that can damage the pavement. However, the initial installation can be costly and the system does require energy to run, which can increase your utility bills. Maintenance and potential repairs should also be factored into long-term considerations.
How long does a heated driveway installation typically take to complete?
The time it takes to complete a heated driveway installation depends on various factors such as the size of your driveway and the complexity of the project. On average, the process might take anywhere from a few days to a couple of weeks. Ensure you have a clear timeline from your contractor before the project begins to avoid any unexpected delays.
Final Notes
Installing a heated driveway offers several benefits, including convenience and safety; you won’t have to worry about strenuously clearing your driveway from snow and ice. Your winters will be more manageable, and the lifespan of your driveway will be extended.
Electric systems are the more popular choice: they offer simplicity, lower upfront costs, and flexibility in customisation. Hydronic systems on the other hand offer efficient heating but more complex installation and integration with the home’s plumbing system.
By carefully planning the driveway instillation process with the help of experienced professionals, you can be aware of the necessary costs and requirements of the system that best suits your needs. Contact Green Wave Distribution today for experienced guidance designing your system.