


Key Takeaways
- While the process might appear daunting at first, a dedicated DIY enthusiast equipped with a clear plan, the right tools, and patience can execute a DIY underfloor heating installation effectively.
- Proper installation directly impacts the system’s performance, safety, and durability. Ensuring that every step is meticulously followed will yield the best results.
- Attentiveness to installation details not only ensures efficient heating but also extends the lifespan of the system.
Whether you just want to heat your basement, or install a new heating system throughout your entire home, radiant flooring can do the job.
In this guide we’ll show you all the steps you need to ensure a successful underfloor heating DIY project.
Can You Actually DIY Radiant Floor Heating?
Yes. 100%.
While professional installation guarantees expertise, a well-informed homeowner can manage radiant floor heating installation themselves.
The key lies in understanding the process, obtaining quality materials, and taking methodical steps.
For complex tasks, especially with hydronic systems, seeking professional advice is recommended if you aren’t 100% confident in your own abilities or knowledge.
Keep reading to learn all the facts and myths of radiant heating you need to know for your DIY efforts.
Pros & Cons of Do it Yourself Radiant Heating
You may already be convinced of the benefits of radiant heating over forced air or other more traditional heating systems, but what about the pros and cons of DIY vs professional installation?
Let’s take a closer look.
Pros:
- Cost Savings: By handling the installation yourself, you can save on labor costs.
- Customization: DIY allows you to tailor the system to your specific room layout and heating needs.
- Personal Satisfaction: Completing a project like this provides a tremendous sense of accomplishment.
- Learning Experience: Gain in-depth knowledge about your home’s infrastructure and heating solutions.
Cons:
- Complexity: Some steps, especially in hydronic systems, can be complex.
- Risk: Improper installation can lead to inefficiencies, system failures, or safety issues.
- Time Consuming: Depending on the size of the project, it can be time-intensive.
- Lack of Warranty: Some manufacturers might void the warranty if the system isn’t installed by a certified professional
Cost and Materials Overview
The costs of radiant floor heating will vary, mainly depending on the type and room size.
Electric systems are generally more affordable, with materials ranging from $8–$15 per square foot minus what you save on labor costs (typically $50–$75 per hour)
Hydronic systems, though more complex, can be more cost-effective in larger spaces, with costs between $6–$20 per square foot, again minus what you would have paid for labor.
Primary materials include:
- Heating mats or cables (electric systems)
- PEX tubing (hydronic systems)
- Thermostat and sensors
- Insulation materials
- Floor leveling compounds
- Heat transfer plates (for hydronic systems)
Safety Considerations
- Electric Shocks: When working with electric systems, always ensure power is turned off to prevent shocks.
- PEX Tubing Care: With hydronic systems, avoid puncturing the PEX tubing.
- Ventilation: When using self-leveling compounds or adhesives, ensure proper ventilation in the room.
Skill and Time Requirement
A DIY approach requires basic knowledge of flooring, some plumbing skills (especially for hydronic systems), and electrical basics for thermostat installation.
For electric systems, allocate a weekend for a standard room. Larger rooms or hydronic systems may require 3-5 days, especially if it’s your first time.
It is strongly recommended that you employ the services of a qualified electrician to ensure the safety of your DIY underfloor heating installation.
Underfloor Heating DIY Top Tips

Precise Measurement:
Accurate measurements of your room will prevent unnecessary expenditure and ensure even heat distribution.
Invest in Quality Materials:
Opt for reputable brands and high-quality materials for reliability and longevity.
Insulation is Key:
Ensure proper insulation to maximize efficiency, heat retention and cost savings over the long term.
Do it Yourself Radiant Heating - Step by Step Guide - Electric Radiant Floor Heating
Step 1: Prepare the Workspace
Clear the room, removing any furniture and fixtures. Strip the existing floor, if necessary, down to the subfloor. Clean and inspect for damage; any inconsistencies should be addressed to ensure a flat surface.
Step 2: Layout and Spacing
Sketch a layout of your room, marking any fixtures or furniture that will be permanently placed. These areas typically won’t need heating. The cables or mats should be spaced evenly, often about 3 inches apart, for uniform heat distribution.
Step 3: Install Electric Heating Mats or Cables
Begin at the thermostat location and roll out the mats or lay out the cables as per your planned layout. Avoid stretching or stressing the wires. Use adhesive tape or hot glue to secure them in place.
Step 4: Position the Thermostat and Power Supplies
The thermostat should be located about 5 feet from the floor, away from direct sunlight or drafts. Keep power supplies away from potential water sources.
Step 5: Install the Thermocouple
The thermocouple, a sensor, should be placed between two heating cables, ensuring accurate temperature readings.
Step 6: Level the Floor
Apply a self-leveling compound over the cables or mats to protect them and create a smooth surface. Follow the manufacturer’s curing time before proceeding..
Step 7: Electrical Connections
Once the compound is dry, connect the system to the power supply. Adhering to local electrical codes is paramount. If uncertain about this step, consult with an electrician.
Step 8: Install the Final Floor
Select flooring materials that are compatible with radiant heating. Stone, ceramic, and porcelain tiles are popular choices because of their excellent heat conduction properties.
Do it Yourself Radiant Heating - Step by Step Guide - Electric Radiant Floor Heating
Step 1: Layout and Spacing
Determine the optimal layout for your PEX tubing, factoring in the room’s size and shape. Typical spacing is between six and eight inches.
Step 2: Drill Holes for PEX Tubing
Using a drill, create holes in the joists to facilitate the PEX tubing, ensuring they are large enough to prevent any chafing.
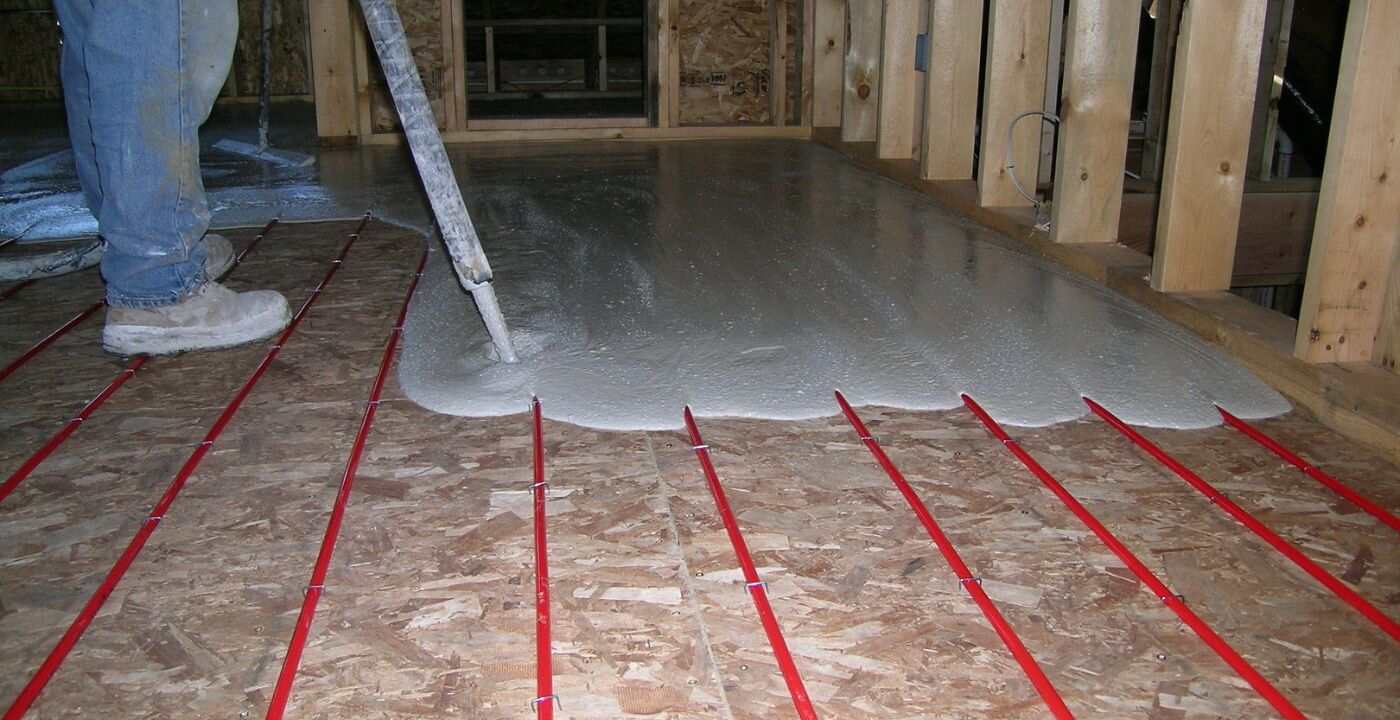
Step 3: Install PEX Tubing
Insert the tubing into the heat transfer plates, securing them to the subfloor using appropriate fasteners. Ensure the tubing runs are parallel and evenly spaced.
Step 4: Position Elements and Thermostat
Similar to the electric system, the thermostat should be wall-mounted, away from heat sources or drafts.
Step 5: Install Insulation
Place insulation directly beneath the PEX tubing. This step is crucial to prevent heat loss downwards and to direct the warmth upward into the room.
Step 6: Make Plumbing Connections
Connect the PEX tubing to the manifold and then to your heating source, be it a boiler or water heater. Ensure connections are tight to prevent leaks.
Step 7: Test the System
Fill the system with water and inspect for leaks. Start the system and check the heat distribution. Any cold spots might indicate air in the system and may require purging.
Step 8: Finalize Floor Installation
Just as with the electric system, you can now install your choice of flooring. Ensure it’s suitable for hydronic radiant heat.
FAQs
How much will DIY radiant floor heating cost me?
Costs can vary based on the type of system, the size of the room, and the materials you choose. On average, homeowners might spend between $5 to $15 per square foot on the system alone.
Are there specific floor materials I should avoid?
Thick carpets or certain types of wood might insulate heat, reducing the efficiency of the system
What's the recommended maintenance for radiant heating systems?
Radiant systems require minimal maintenance.
For hydronic systems, an annual checkup of the boiler and pumps can enhance lifespan. Electrical systems have no mechanics or moving parts so typically do not require any maintenance.
Conclusion
Radiant floor heating stands as a testament to modern home innovation, providing not just warmth, but a consistent, energy-efficient heat distribution that can elevate the comfort level of any space.
However, for homeowners contemplating whether to embark on this DIY journey, it’s essential to weigh the benefits against the challenges.
If there’s any uncertainty about your ability to manage any part of this project, it may be in your best interest, and that of your home, to seek professional assistance.
For a better understanding of what the professionals offer, get in touch today.